OK…break time is over. Two weeks in Japan for a funeral followed by a week-long jet-lag hangover is all I can take…time to get back to work/play in the boatyard. 🙂
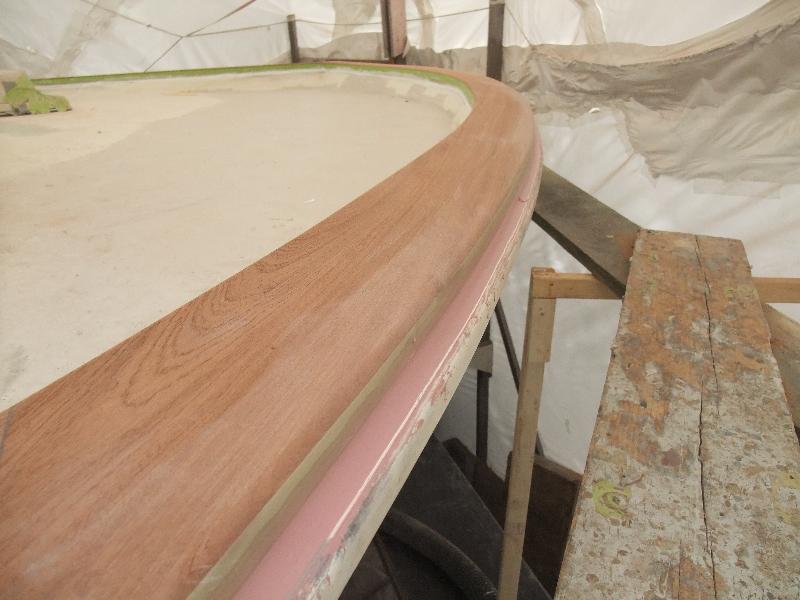
With the final Awl Grip 545 prime coat applied to the cabin top in mid-May 2013, the next order of business was to finish installing the mahogany toe rail that was rough cut back in early May. The toe rail has to be installed first because the approach we’re using is very different than what Chris Craft did originally. The biggest difference is that the boards are epoxied to the deck before we screw them down, as opposed to using bedding compound to seal the joint. The boards are also 1-3/4″ thick, as opposed to the original 1-1/2″.
The additional 1/4″ of thickness is hidden behind another big difference from Chris Craft and many other classic boat manufacturers’ approach to wooden toe rails: there is epoxy fairing compound and fillets covering the aluminum-to-wood joint. The fillets end 3/8″ or so above the joint, so there’s is virtually no opportunity for water to wick in between the wood and the aluminum deck joint below.

Gluin’ & Screwin’
First, we positioned the boards and clamped them in place. Then we drilled the screw holes and counterbores. The screw holes went through aluminum deck. We then removed the boards and tapped all 196 holes for 1/4-20 screws. The next step was to mix up the epoxy and coat the bottom surface of all the boards. We had to coat the boards twice because the first coat really soaked into the mahogany. With the bottom side wetted out, we mixed the remaining epoxy with wood flour and coated the scarf joints, then troweled more epoxy and wood flour on the contact area of the deck.

Clamps hold the scarf joints together.
Machine screws threaded into the deck are the same way Chris Craft attached the original toe rails. But where the original screws were chromed bronze, we went through two boxes of 316 stainless screws to reduce the possibility of copper in the bronze interacting with the aluminum and causing corrosion. On the principle of “better living through chemistry,” we also coated each screw with Tef-gel before threading them into the deck. Tef-gel is said to be very good at eliminating corrosion caused by dissimilar metals.

Bungs give the rail a classic look
Initially, we considered doing the rail the same way they do at Weaver Boatworks, where they rely entirely on epoxy to bond the teak cap rails to their multimillion dollar sportfishermen. But the Weaver approach involves drilling hundreds of holes in the deck for clamps to secure the rail until the epoxy cures, after which the holes in the plywood deck are bunged and fiberglassed over. Since the Roamer is an aluminum hull with aluminum decks, I rejected the idea of drilling lots of holes.
We also considered using the original screw holes and screwing the toe rail down from the underside. But I’ve owned enough cars and boats to have condemned many an engineer who designs things without maintenance in mind. Inaccessible screws behind the cabinetry would not be maintenance-friendly, should any of the toe rail have to be replaced. So screws from below were a no-go.
While bungs present a hole in the top surface, though which water might migrate, that’s a concern only if we don’t keep up on the maintenance. Plus, I like the look of bungs…they add to the classic beauty, I think.

A shocking discovery the following morning!
I arrived last Saturday at 7am to find that the Boatamalans were already hard at work. They’d coated the entire toe rail with black spray paint…the same way they did when they were longboarding the cabin top. The downside of the spray paint is that it so completely covered the wood that you couldn’t see any of that beautiful grain. The upside came later in the day, when all the sanding was done.

Longboarding removed all the black paint… it’s ready for fillets
We first sanded the mahogany with 60 grit, then 120 and finally 240. The black paint guide coat really helped see low and high spots. We used that wonderful Mirka Abranet sandpaper–it’s expensive, but pays for itself in no time because it cuts like razors and lasts a good, long time.

Got wood???
Toe rail fillets and second story scaffolding
While the fairing crew was sanding away and then taping and applying the fillets in Awl Fair, I was building the scaffolding. We’ll need the second level scaffolding for painting the clear coat on the toe rail and for the AwlCraft 2000 Matterhorn white everywhere else.

Good lookin’ fillets!
The fillets here will serve the same purpose as they will at the helm station dash pod and along the cabin top-to-deck joint: they shed water and dirt far better than seams. They’re also much more aesthetically pleasing and should reduce maintenance.

On the inside fillets, we mixed up some homemade fairing compound with West System, cabosil and 3M , microballoons.
We ran out of Awl Fair, the red fairing compound, right on schedule. We’re fast approaching the end of the bodywork phase, so we’re trying to use up all of the canned materials that are open and have a shelf life.

At the end of the weekend, I cut the vent holes.
We won’t want to cut any holes like this after spraying on the shiny Imron MS1 clear coat.

Drill up from the bottom, then cut from the top.


Ready for Imron MS1!
Actually, the next step will be to sand the fillets around the toe rail, remove the tape, then retape over the fillet and spray the MS1 clear coat. Once we’ve got ten nice coats of MS1, we’ll tape off the clear coat, cover it with cardboard for protection, and then spray primer on the fillets.
If we can hold to the current schedule, we’ll be painting the topsides starting in two weeks!
Next up in our 1969 Chris Craft Roamer 46 Refit: “Shiny” on the Toe Rail.

She is going to be beautiful mate and you should be rightfully proud of your efforts. Your humble fan!
Hmmm,…, Imron MS1 clear coat,…., lasts 4-5 yrs until just a “respray” is required:
http://www.myvirtualpaper.com/doc/ClassicYacht/classicyachtmayjune2011/2011050901/94.html#94
Thatz good (great)!
I always learn so much here (but get really tired reading/comprehending).
Ole’fashioned bung holes, eh? Well, color you screwy, louie, dog-dooie Matsui.
Great work as always (fearfully so).
Cheers!
-Eric
(stillwaitingforpaintertoapplyexpoxyprimerwhilewegotothecapeonvacationhere)
Q, I am using your blog for my exercise, I am worn out at the end of each installment. Great work your boat should be good for another 50 years with little maintenance. Are you going to charge for tours? Put me on the list.
Tim
Tim, I won’t charge for tours…but only if you come help! 😉
Beautiful!!!!!
Thanks, John!